Using the Cylance Protect API in Postman
The Cylance Protect REST API is a great way to query information on your Cylance Protect instance. Before I start to work with any REST API in my code, I like to bring out Postman to test out the API first. However, one crucial step is necessary before you can start making any requests to the API: getting an access token. Generating a valid JWT in order to request the access token requires some extra scripting. This step is not the easiest to do in Postman so let me share my suggestions on how to get you started.
How does authentication work with the Cylance Protect API?
All REST endpoints of the Cylance Protect API require an access token to authenticate the request. In order to generate the access token, you must send a POST request to the following endpoint:
{{service_endpoint}}/auth/v2/token
Within the body of the request, you must send a JSON blurb with the following format:
{
    "auth_token": "{jwt_token}"
}
Where {jwt_token} is an authentication token that follows the JWT standard that you must generate yourself. The question then becomes, how do you generate a JWT authentication token? And what even is a JWT token?
The JWT standard
JWT (JSON web token) consists of 3 parts: the header, the body, and the signature. Each portion is base-64 encoded and separated with a dot (.) . The elements of the body portion in a JWT are called its claims. The following are registered claims for JWTs:
- exp – the Unix epoch time in seconds when the token will expire
- iat – the time when the token was issued in Unix epoch seconds
- iss – the principal issuing the token (we’ll be using http://cylance.com)
- jti – unique token ID, such as a randomly generated UUID.
- sub – principal subject (we’ll use this for the application ID)
The following are custom claims which will also be required for getting the access token:
- scp – comma separated scopes being requested (this is optional)
- tid – the tenant ID
Scopes are optional, however, if you want to limit the scope of your access token and only have authorization to perform certain actions, you can add the specific scopes you require. A list of scopes can be found here.
For the header, you simply need to specify a JSON blurb which says what type of hash algorithm will be used for signing the key with your app secret. It looks something like this.
Here, we’re using the SHA-256 hashing algorithm.
Finally, the signature component is the base64 encoded header and body separated by a dot after being passed through the hashing algorithm using your app secret as the key. This final component is encoded with base64 and then appended to the rest of the token, again separated by a dot.
It is important to note a few subtleties though. For one, base64 strings are often terminated with two equal signs (==). These equal signs must not be included in any of the base64 encoded portions. Additionally, you should be mindful of if the language you’re using. Does it use the URL safe base64 encoding?. If not, you must replace all the plus signs (+) and the forward slashes (/) with hyphens (-) and underscores (_), respectively.
Putting all of this into Postman
Let's put this all together so we can start to write a script to automatically grant us access in Postman.
Create a new POST request in Postman to the following endpoint:
{{service_endpoint}}/auth/v2/token
Now add in some code to generate the JWT token in the pre-request script section which is shown here.
Make note of the Body and Tests sections as well because we’ll be using them later.
First, import the required packages.
var uuid = require('uuid');
This package will be used to generate a unique UUID for the JTI claim of the JWT.
Then, we can define the header and the body.
const jti_value = uuid.v4();
// Set headers for JWT
var header = {
    'alg': 'HS256'
};

// Prepare timestamp in seconds
var currentTimestamp = Math.floor(Date.now() / 1000)

var data = {
  "sub": appID,
  "tid": tenantID,
  "iat": currentTimestamp,
  "exp": currentTimestamp+1800,
  "iss": "http://cylance.com",
  "jti": jti_value
}
The tenant ID, app ID, and app secret (which is going to be used later) can be found in your Cylance Protect console under Settings > Integrations.
We add 1800 to the exp claim because 1800 seconds corresponds to 30 minutes. This is the maximum amount of time the access token can be valid. If you request for longer, you will not receive an access token and will instead get an HTTP 400 error response (bad request).
We then need to encode the header and body using base64. However, we need to ensure the token is URL safe by replacing plus signs and forward slashes with hyphens and underscores respectively, then removing the equal signs at the end of the encoded string. A helper function will be useful for this.
function base64url(source) {
    // Encode in classical base64
    encodedSource = CryptoJS.enc.Base64.stringify(source)

    // Remove padding equal characters
    encodedSource = encodedSource.replace(/=+$/, '')

    // Replace characters according to base64url specifications
    encodedSource = encodedSource.replace(/\+/g, '-')
    encodedSource = encodedSource.replace(/\//g, '_')

    return encodedSource
}
Then we just encode the header and body and separate them with a dot.
// encode header
var stringifiedHeader = CryptoJS.enc.Utf8.parse(JSON.stringify(header))
var encodedHeader = base64url(stringifiedHeader)
// encode body
var stringifiedData = CryptoJS.enc.Utf8.parse(JSON.stringify(data))
var encodedData = base64url(stringifiedData)

// build token
var token = `${encodedHeader}.${encodedData}`
We’re not done yet though, because we still need to sign the token. We can store the signed token in the Postman collection variables.
// sign token
var signature = CryptoJS.HmacSHA256(token, jwtSecret)
signature = base64url(signature)
var signedToken = `${token}.${signature}`

pm.collectionVariables.set('jwt_signed', signedToken)
Note that jwtSecret is the app secret.
Ensure that you save this request as a part of a collection since we are adding the token into a collection variable. Any future requests that use the access token should also be within the same collection.
Now we have code to generate a JWT, and we simply need to add it to our request body in order to receive our access token.
In the Body section of the Postman request, add the following JSON blurb.
{
    "auth_token": "{{jwt_signed}}"
}
The double curly braces tell Postman that you are using a variable. Ensure you put quotes around the variable, so the JSON is properly formatted.
If you were to hit send now, you should successfully receive an access token. However, let’s go one step further. Instead of just receiving the access token, let’s store it in a collection variable that can be used in all our future requests, so we don’t need to copy and paste it in.
In the Tests section of the Postman request, add the following code.
let response = pm.response.json()
pm.collectionVariables.set("access_token", response.access_token);
And that’s it for getting the access token! Using the access token in future requests now becomes super easy, you just need to pass in the access token variable wherever it’s required. For example, here's how you would get the users for your tenant.
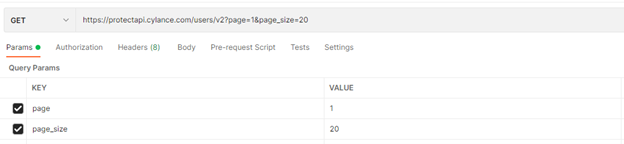
Send a GET request to the following endpoint
{{service_endpoint}}/users/v2?page={{page_number}}&page_size={{page_size}}
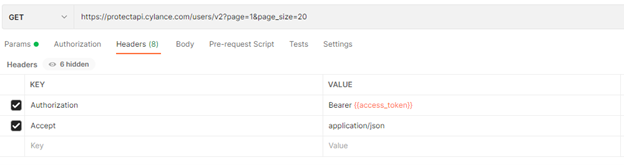
You can add the page and page_size in the Params section to make things a little easier. Then in the Headers section, add in the following headers
Authorization: Bearer {{access_token}}
Accept: application/json
Again, the double curly braces tell Postman that this is a variable. Your request should look like the following screen shots.
Now you can hit send and you should receive a list of users. Simple as that! And with that you now know how to send whatever Cylance Protect API requests you want with Postman.
To learn more about the capabilities of the Cylance REST API, check out my previous blog which describes how to remotely lock down a device!
About Nathaniel Johnston
Enterprise Solutions Development Student - IoT