IoT Smart Security System
Today, security systems are a necessity for the vast majority of businesses and homes. This blog talks about a project that enhances security systems with secure communications from BlackBerry Spark Communications Services, and emergency alerts through AtHoc.
Typically, when a security system detects a threat, you don’t want an alarm to just go off, you want to know about it. The security system needs to notify you about what happened. And wouldn’t it be nice if you could see what made the alarm go off? Or how about remotely controlling the alarm system from anywhere in the world? That sounds great, but how do you implement such a feature while ensuring it is secure? We need to trust that hackers won’t be able to remotely disable your alarm. Only you should have that power. Well... in comes Spark Communication Services to save the day! With Spark, we can send messages securely between a central security system and an app on a user’s phone. With Spark, we remotely arm and disarm the system, have the security system send GIFs of threats, send pictures of faces of intruders it detects, and more!
How does AtHoc fit in? AtHoc is meant to try and contact the user by any means possible. In this case, it is used to contact the user of a threat and make sure they respond to it.
Required parts
- ESP8266 microcontroller
- RaspberryPi
- ArduCam OV2640
- HC-SR04 Ultrasonic Sensor
- 4x4 keypad
- Piezo buzzer
- Android phone
- Push button
- 1 kOhm resistor
How does the system work?
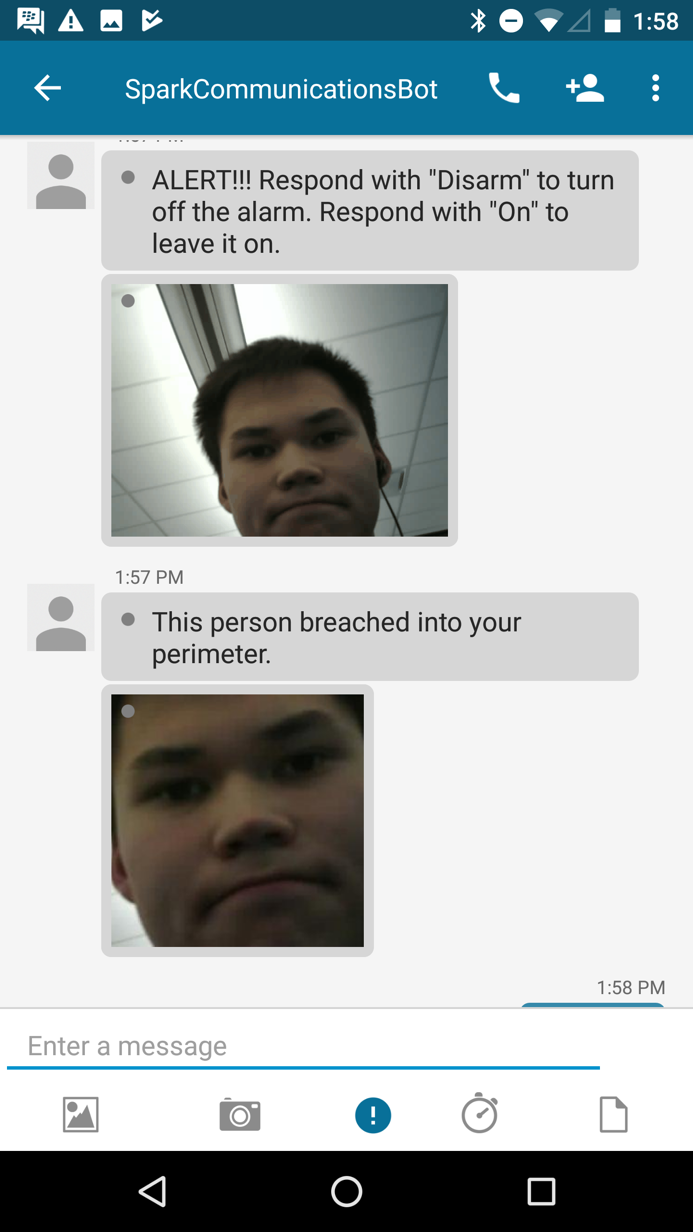
When someone breaks in, their motion will be detected by an ultrasonic sensor. This will tell the camera to start taking pictures. At this point, the system gives whoever entered 30 seconds to disarm the system. This can be done by entering the correct PIN into the keypad, by sending a “Disarm” command through the app, or it may be automatically disarmed if the app sends a location which is within a 50m radius of the central security system. If the system is not disarmed, a GIF is made from all the pictures and sent to an app on the user’s phone. The system also scans the pictures for faces. If it sees one, a cropped picture of the face is also sent to the user’s phone. If the user does not respond to the threat through the app (either by disarming the system or telling it to keep the alarm on), an AtHoc alert is sent to ensure they are aware of the threat.
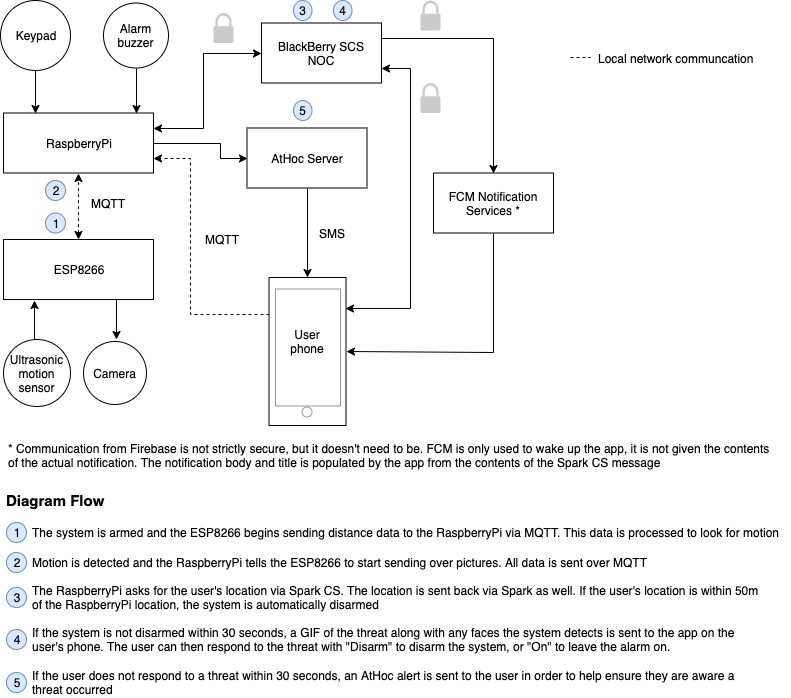
A high-level system architecture is shown below.
There are three major components to the system: the ESP8266 microcontroller, the RaspberryPi, and an Android Spark CS app.
The ESP8266 is responsible for controlling important sensors including the ultrasonic sensor, and the camera module. In a full product, there would be a number of these microcontrollers distributed across an area in order to monitor motion over the entire area. In this PoC, there is only one, but it could easily be extended to add more.
The RaspberryPi acts as a central server and performs all the major operations. It is connected to the keypad and buzzer. In addition to controlling these components, the Pi processes distance data from the ultrasonic sensor, receives images from the ESP8266 and turns them into GIFs, detects faces in the received images, sends messages and alerts to the Android app via Spark, and sends AtHoc alerts.
The Android Spark CS app receives messages from the Pi and allows the user to control the system remotely. It also automatically sends location data for automatic disarming and it sends user data for user registration.
Communication between the ESP8266 and Pi is done over MQTT. Data sent from the ESP to the Pi includes pictures (sent as base-64 in small packets), and ultrasonic distance data. In the other direction, the Pi sends the armed state of the system, and info about when to take pictures. MQTT is also used for user registration, this communication is from the Android app to the Pi.
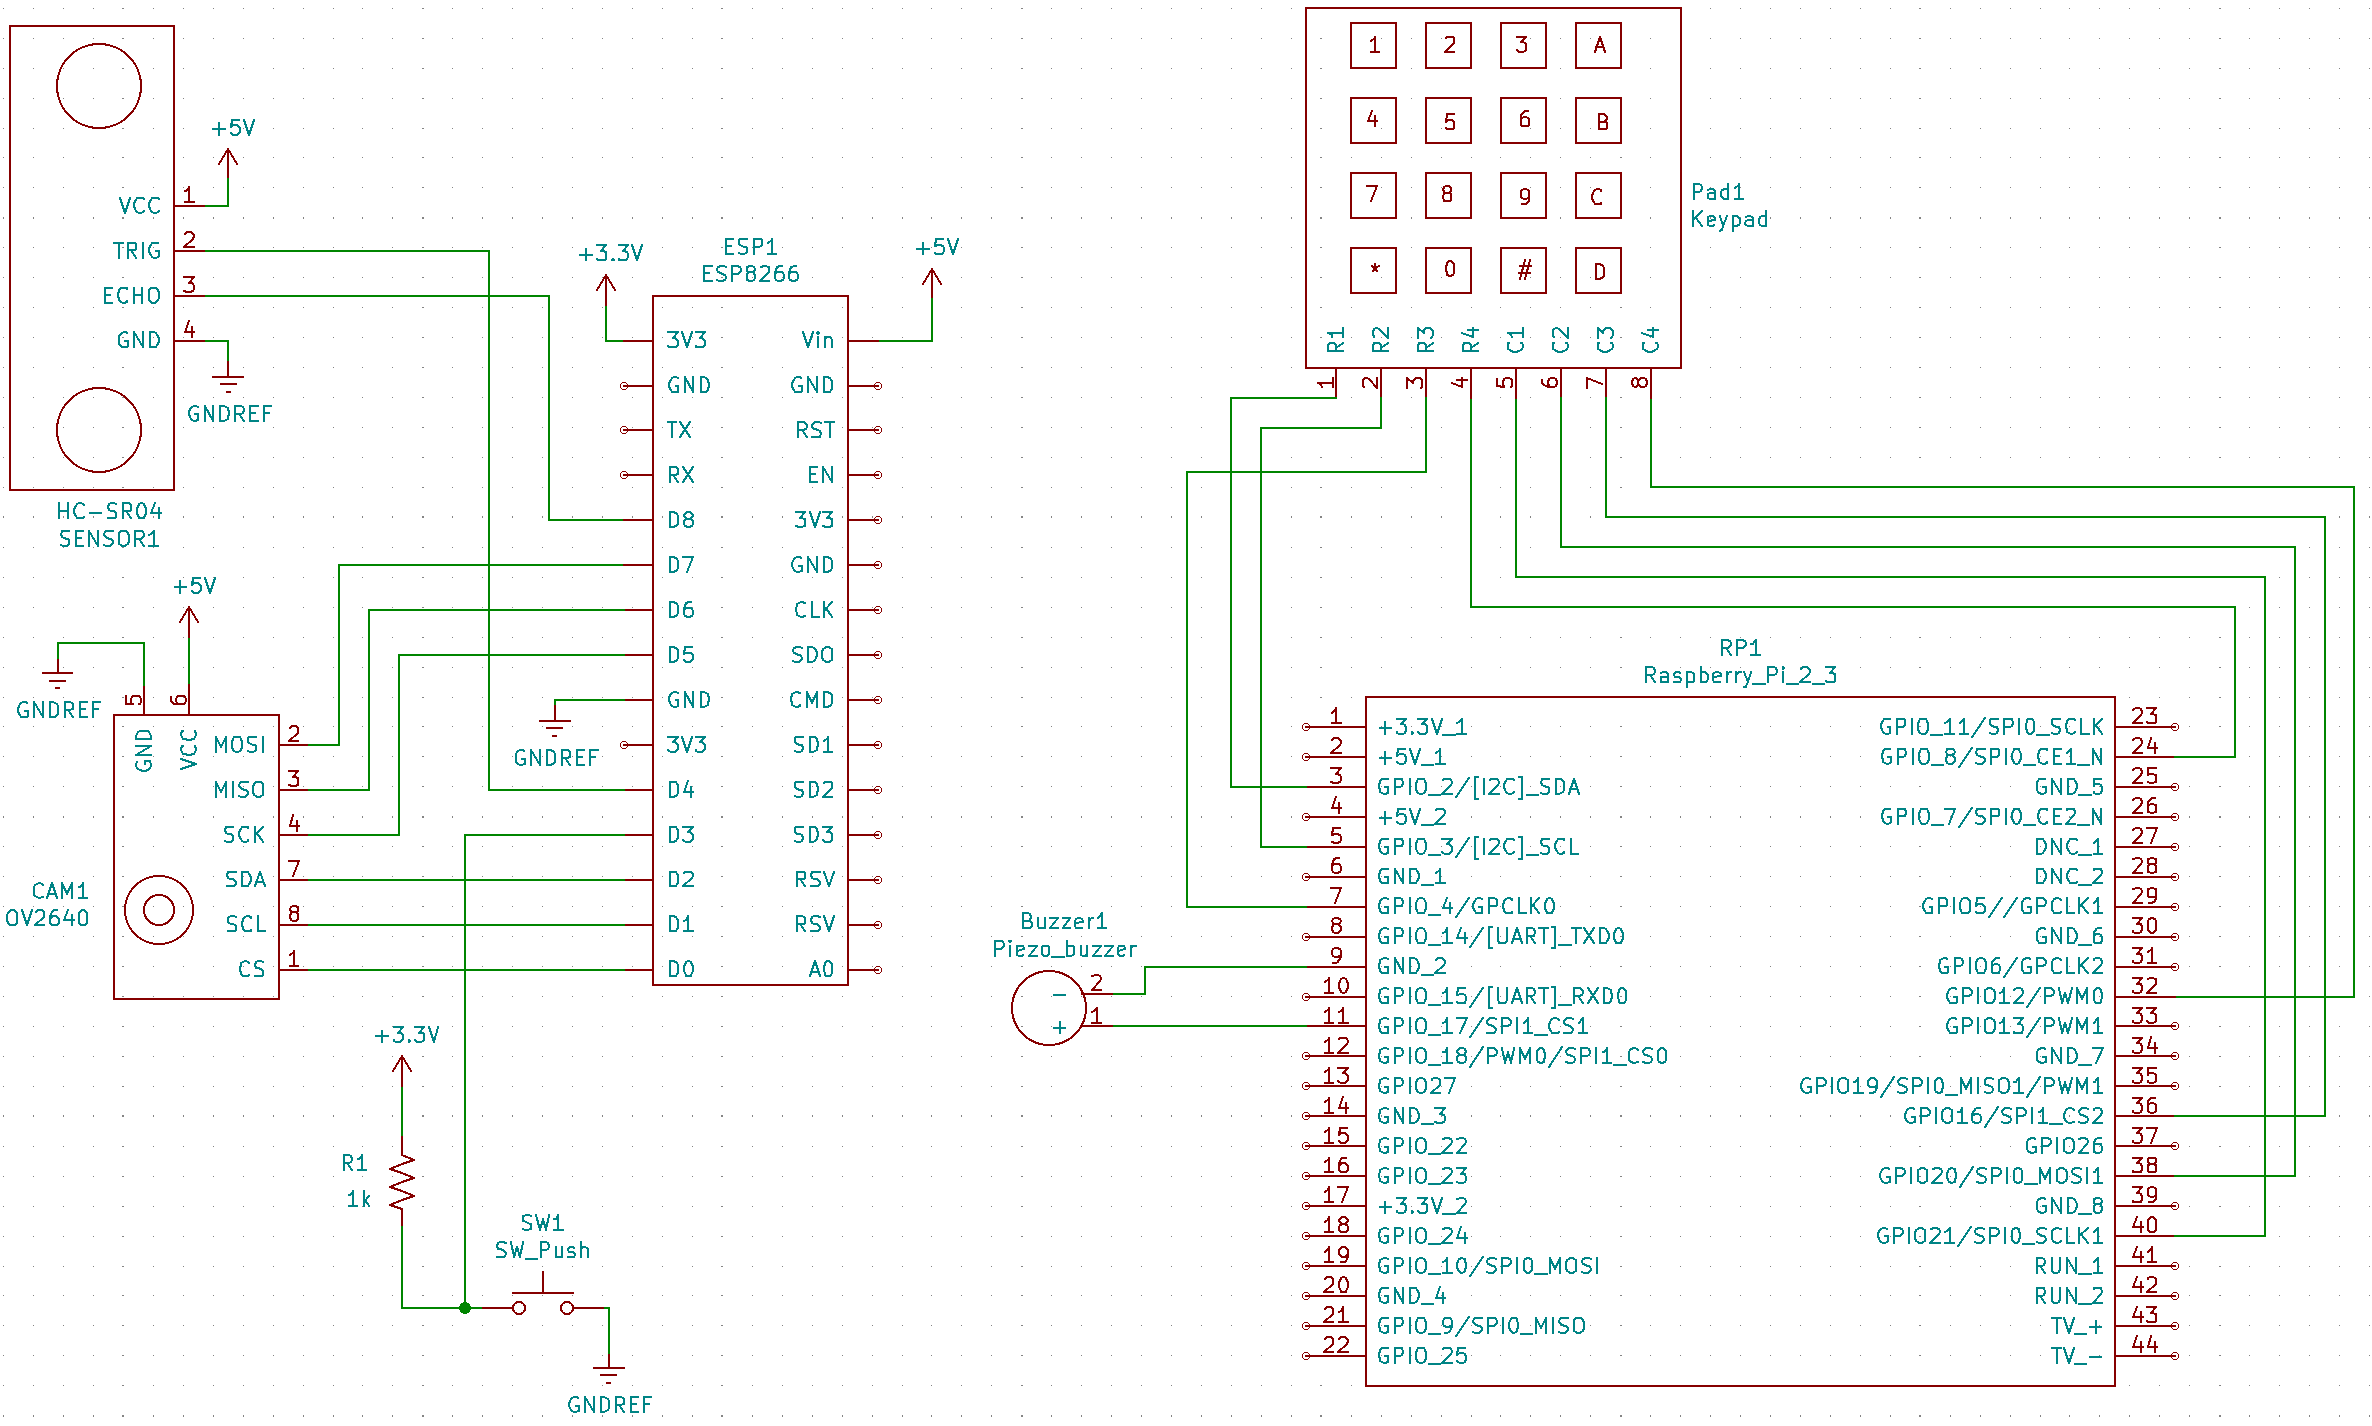
The wiring for the ESP8266 and Pi is shown below:
Note: Power ports (GNDREF, 5V, and 3.3V) of the same type are connected electrically and will need to be connected on your system. They are not directly connected in the schematic for readability.
System Setup
The first thing you should do is download and unzip this project. The project along with setup/installation instructions can be found on the BlackBerry Community Samples Github page.
Connecting ESP826 to WiFi
You can connect the ESP8266 to WiFi via the Android app. On the side menu, there is a Connect Wifi option. With this option, you just need to enter the WiFi password and hit CONFIRM. This will make the ESP module connect to the same WiFi, if it is not already connected to a network.
User setup
Once the setup is done, you will need to run the Spark bot and setup a user with the system. Instructions on how to run the bot can again be found in the BlackBerry Community Samples Github page under the ‘System use’ section. Now you can setup a user (Note: for this PoC, you can only setup one user). To do this, press 'B' on the keypad and create a user or login to the Android app. You have 30 seconds to login to the app and successfully setup a user. Otherwise, you will have to logout and go through the entire process again. Once a user is setup with the system, the user will receive a message from SparkCommunicationsBot.[JJ1] [NJ2] Now the system is ready to go!
System use
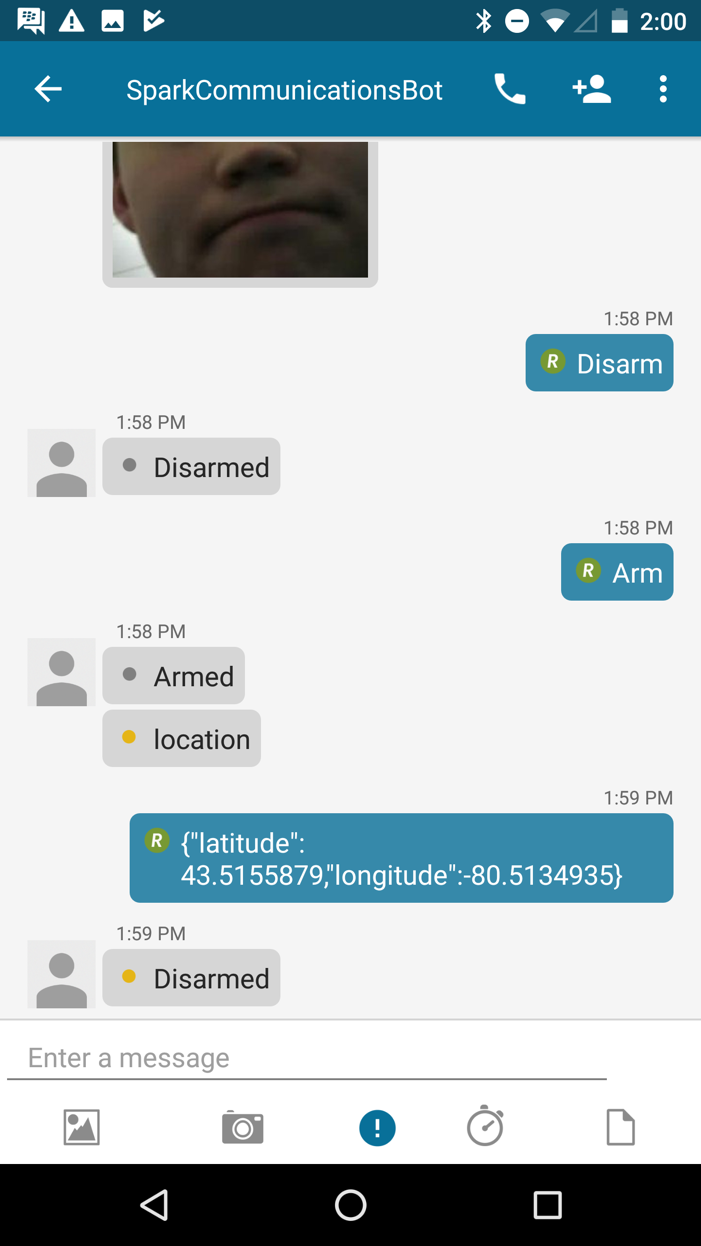
The system is relatively simple to use once all the setup is done. There are a few simple commands you can use to arm and disarm the system from the Android app. These commands are outlined in the table below and can be seen in action in the screenshots under the Pictures and Screenshots section.
Command
|
Function
|
Arm
|
Arms the system
|
Disarm
|
Disarms the system
|
On
|
Leaves the alarm during a breach
|
A keypad can also be used to Arm and Disarm the system. Pressing ‘A’ arms the system and entering your pin followed by the ‘#’ key disarms the system.
To trigger an alert, simply arm the system and move something in front of the ultrasonic sensor. This will start the process of making a GIF, if the system detects any faces, a screenshot of the face is sent to the chat.
As mentioned previously, AtHoc is used when the user does not respond to a threat quickly enough (either by disarming the system or by leaving the alarm on). I set the amount of time before an AtHoc alert is sent to 30 seconds. However, this time can be set to any arbitrary value.
Pictures and Screenshots