Securing the Edge of a Thread Network using BlackBerry Spark Communications Services
A Thread Network is a low power (LoPAN) mesh network. It’s standards body – The Thread Group – describes it as:
· Thread is a low-power wireless mesh networking protocol, based on the universally-supported Internet Protocol (IP), and built using open and proven standards.
· Thread enables device-to-device and device-to-cloud communications and reliably connects hundreds (or thousands) of products and includes mandatory security features.
· Thread networks have no single point of failure, can self-heal and reconfigure when a device is added or removed, and are simple to setup and use.
· Thread is based on the broadly supported IEEE 802.15.4 radio standard, which is designed from the ground up for extremely low power consumption and low latency.
A Thread Network can make it easy for many devices in close proximity to connect to one another. One challenge that can arise from this configuration is how to connect a group of devices on a Thread network to external sources and enable secure bi-directional communication. Maybe you need to communicate with cloud servers, or another group of Thread connected devices in a different location. You could configure VPNs between these networks, but that will add complexity and require firewall changes that may not be possible.
The BlackBerry Spark Communications Services (BBSCS) can be used to solve this. It enables secure, bi-directional communication that is outbound initiated. Devices using it make an outbound connection to the BlackBerry Infrastructure, so no firewall changes are required to support inbound communication. This can result in a product that is quicker and easier to deploy in various network environments.
Watch the following video for an overview of these sample applications and to learn how the BlackBerry Spark Communications Services can be used to secure the edge of a LoPAN network.
Getting Things Ready
The Sensors
As of writing, Android Things supports the Raspberry Pi 3 B, not the current B+ model. That means you’ll need to locate the older model or use the NXP i.MX7D Starter Kit with a different sensor instead. Recently Google announced they are refocusing Android Things on smart screens and speakers. You can watch for support in issue 76155541 in the Google Issue Tracker for B+ support.
Assuming you do have one or more Raspberry Pi 3 Bs, mount your Pimoroni Rainbow HATs on each one and flash the Android Things image onto your SD cards.
The Nordic Semiconductor nRF52840 DKs
There are two pre-built binaries you can use with this example. I’ve tried both and didn’t run into any issues. You can choose the binary included in the nRF5 SDK for Thread and Zigbee, which is located in this directory: nRF5_SDK_for_Thread_and_Zigbee_2.0.0_29775ac\examples\thread\cli\usb\hex
Alternatively, you can use the binary supplied from OpenThread.
The OpenThread documentation has excellent instructions for flashing these boards with a Thread image, which they keep up to date. I can attest for this as feedback I sent was quickly applied. Follow their instructions to flash all of your nRF52840 DKs.
The OpenThread Border Router
OpenThread provides excellent instructions for setting up their Border Router on a Raspberry Pi 3. Follow their guide here. For my installation, I did not do the section “Wi-Fi Access Point Setup for OpenThread Border Router” because I wanted to be able to use the Pi’s Wi-Fi to connect to the Internet instead (alternatively you can use the Pi’s ethernet connection for internet access). If you wish to do the same, there are some additional steps required. The OpenThread Border router uses network manager, which conflicts with the Raspberry Pi’s default Wi-Fi network configuration and cause it to repeatedly tell you to configure the country code.
Additional Steps to use Wi-Fi for Internet Connectivity
1. Ensure you did not perform the steps in the OpenThread border documentation “Wi-Fi Access Point Setup for OpenThread Border Router” section.
2. Install the required packages for network manager:
sudo apt install network-manager network-manager-gnome openvpn \
openvpn-systemd-resolved network-manager-openvpn \
network-manager-openvpn-gnome
3. Remove unrequired packages:
sudo apt purge openresolv dhcpcd5
4. Replace /etc/resolv.conf with a symlink to /lib/systemd/resolv.conf
sudo ln -sf /lib/systemd/resolv.conf /etc/resolv.conf
5. If you are using Raspbian with a GUI, you can also configure it to be shown as an applet.
a. Right click on the task bar.
b. Click on “Panel Settings”.
c. Click on the Panel Applets tab.
d. Remove Wireless & Wired Network.
6. Reboot.
7. After rebooting the network managed applet should appear in your task bar, where you can attach to a Wi-Fi network.
Now you’ll be able to remotely connect to the OpenThread Border Router Web GUI using the Raspberry PI’s IP address.
How the Samples Work Together
This is described in the video above, so if you’ve already watched that you can skip ahead to the next section.
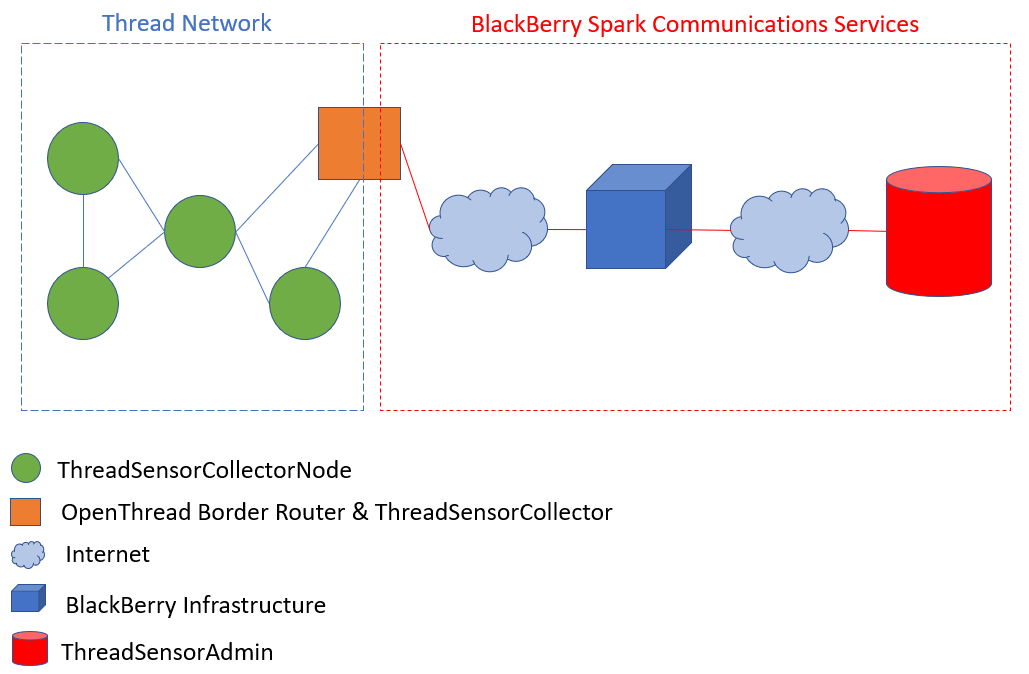
The diagram above provides a visual on interconnectivity between these components. The green circles are Raspberry Pi Android Things devices, with a Rainbow HAT running the ThreadSensorCollectorNode sample. They do not have direct internet connectivity but are able to communicate through one another on the Thread Network to the orange box. The orange box is a Raspberry Pi running the Raspbian OS. It hosts the ThreadSensorCollector sample and also runs the OpenThread Border Router. This device has internet connectivity.
The ThreadSensorCollector sample makes use of the BlackBerry Spark Communications Services SDK for Node.js. BBSCS makes a secure outbound connection to the BlackBerry Infrastructure to allow it to send and receive data. It receives and caches data from the green ThreadSensorCollectorNode devices. At a set time interval, it sends this cached data to the red ThreadSensorAdmin using BBSCS. If the red ThreadSensorAdmin admin is offline, the encrypted payload is queued within the BlackBerry Infrastructure. Confirmation is returned once delivery to the red ThreadSensorAdmin is complete.
The red cylinder is the ThreadSensorAdmin. It is also a Node.js application that uses the BlackBerry Spark Communications Services SDK for Node.js and also creates an outbound connection over the internet to the BlackBerry Infrastructure. This application could run on any Node.js supported operating system. It receives data from the orange ThreadSensorCollector and permanently stores it. ThreadSensorAdmin also provides a web interface to view a graph of temperature data.
Download the Samples
All three samples are available on Github: https://github.com/blackberry/BlackBerry-Communications-Services-Community-Samples/tree/master/Node.js-Community-Samples/ThreadSamples
Configuring the Samples
You’ll need to provide some of your own configuration details into the sample applications to allow them to communicate with one another.
ThreadSensorCollectorNode
Completion of the steps below and deployment of ThreadSensorCollectorNode to Android Things requires adb be connected. To initiate the adb connection, from a Terminal window within Android Studio enter the following command, replacing <IP> with the IP address of the Raspberry Pi running Android Things.
adb connect <IP>
There are a few variables in MainActivity.java that you’ll need to customize.
private static final String UART_PORT
private static final String SERVER_ADDRESS
private static final String LOWPAN_KEY
private static final String LOWPAN_NETWORK
private static final String THIS_DEVICE_ID
UART_PORT
This value must be set to the UART port the Nordic nRF52840 DK is connected to. It can vary based on the USB port the board is connected to. If you plug it into a different port later on, re-run these steps to find its new UART port. To find it:
1. Open a terminal window in Android Studio
2. With the Nordic board disconnected, enter the following command and note the results.
adb shell pio list uart
3. Connect the Nordic board to one of the Raspberry Pi’s USB ports.
4. Re-run the command in step 2 and note the results. There should be a new entry.
Use the new entry displayed after running step 4 as the UART_PORT in MainActivity.java.
SERVER_ADDRESS, LOWPAN_KEY & LOWPAN_NETWORK
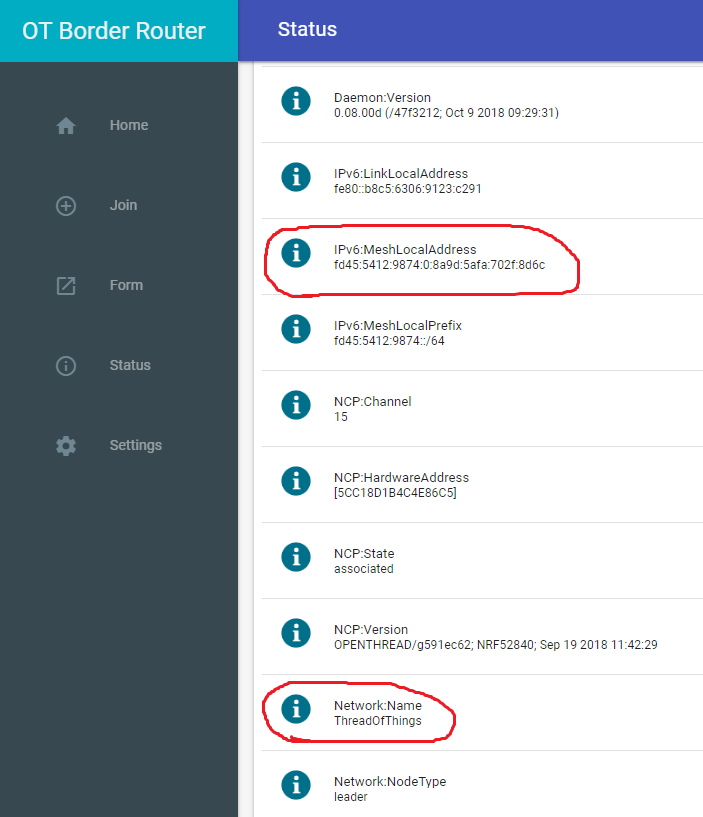
These values come from the OpenThread Border router. Open a web browser to the IP address of the OpenThread Border router to view its Web GUI.
LOWPAN_KEY – Your Thread Network key. This is specified on the OpenThread Border Router when forming the network. It can be set in the OpenThread Border Router WebGUI on the Form screen.
SERVER_ADDRESS – Refers to the IPv6 Mesh Local Address of the Thread Network device running the ThreadSensorCollector. If you are using the same configuration as described in this blog post, this would be the same device that is running the OpenThread Border Router. View this value in the OpenThread Border Router Web GUI on the Status tab.
LOPWAN_NETWORK – Refers to the Thread Network name. You created this value when the network was formed. View this value in the OpenThread Border Router Web GUI on the Status tab.
THIS_DEVICE_ID
THIS_DEVICE_ID is the name the application uses when reporting temperatures. If you are running multiple Raspberry Pis reporting temperature values, ensure that each time you deploy this application that you provide a unique name to each device. Otherwise the data collected will all appear to be from a single device.
ThreadSensorCollector & ThreadSensorAdmin
In order to use the BlackBerry Spark Communications Services, you’ll need to register for a domain using your BlackBerry Online Account. Once complete you will receive domain identifier to use in the sample application.
To make it easier to run these samples, they do not make use of any identify provider (such as Google Sign In or Azure Active Directory). Fictional user names and passwords can be used in steps 3 and 4.
1. Open SparkComms.js from both the ThreadSensorCollector and ThreadSensorCollectorAdmin samples in an editor.
2. Set the SPARK_DOMAIN variable to your BBSCS domain (registered using the link above).
3. Set the SPARK_USER_NAME variable to a unique fictional username.
4. Set the SPARK_PASSWORD variable to a unique fictional password.
Note that you should use a different user name in the ThreadSensorCollector and ThreadSensorAdmin.
Building & Running the Samples
ThreadSensorAdmin
This sample could be run on any device that supports Node.js, such as a Windows PC, Mac or Linux device. This sample does not require connectivity to the Thread Network, but does require internet connectivity.
Steps 1-5 only need to be performed once. Use only step 6 to for subsequent starts of the application.
- Copy this application to the destination device.
- Install Node.js on this device.
- Download and install the BlackBerry Spark Communications Services SDK for Node.js.
- Add the bbm-enterprise Node.js package as a dependency of the sample by running the command below. Note that where FILENAME is the path to the SDK downloaded in step 3.
npm install FILENAME –production
5 .Run the following command to install the other Node dependencies.
npm install
6. Run the ThreadSensorAdmin application by using the following command:
node index.js
7. Open a web browser to the IP address + “/setup” of the device running ThreadSensorAdmin: http://<yourIP>/setup
8. Enter a Collector ID, Collector Spark Reg ID and press Save.
a. Collector ID – Refers to a user friendly nickname for a ThreadSensorCollector.
b. Collector Spark Reg ID – Is the numeric registration ID of the BBSCS account used by ThreadSensorCollector. This value is shown after starting the ThreadSensorCollector. Look for an output line that says:
Spark Comms ready with ID: <YOUR_ID>
9. Open a web browser to the IP address of the ThreadSensorAdmin. You should see the collector you just added in the drop down menu. Choose and press the Select button to view graphs of temperature reports. Each unique ThreadSensorCollectorNode will have its own graph.
ThreadSensorCollector
Ensure that your OpenThread Border Router is running on this device and has formed a Thread Network. You can verify this using the Web GUI of the OpenThread Border Router. Open a browser to this Raspberry Pi’s IP address to view the Web GUI. This sample requires connectivity to both the Thread Network and internet.
Steps 1-5 only need to be performed once. Use only step 6 to for subsequent starts of the application.
1. Copy this application to the Raspberry Pi that is also running the OpenThread Border Router.
2. Install Node.js on this device.
3. Download and install the BlackBerry Spark Communications Services SDK for Node.js.
4. Add the bbm-enterprise Node.js package as a dependency of the sample by running the command below. Note that where FILENAME is the path to the SDK downloaded in step 3.
npm install FILENAME –production
5. Run the following command to install the other Node dependencies.
npm install
6. Run the ThreadSensorCollector application by using the following command:
node index.js
ThreadSensorCollectorNode
ThreadSensorCollectorNode can be deployed and run directly from Android Studio. Ensure that your OpenThread Border Running is running and has formed a Thread Network, which this sample will connect to. After the sample has started and connected to the Thread Network, TNOK should appear on the Rainbow HAT LED display. The sample is now ready to start collecting and reporting temperature data. Touch the A button on the Rainbow HAT to start. It will begin by counting down from 10, take and display the temperature and send the report to the ThreadSensorCollector. Press the B button to stop taking temperature readings. Press the C button during the countdown to randomize the temperature report, allowing you to see more variance in the temperature reports.
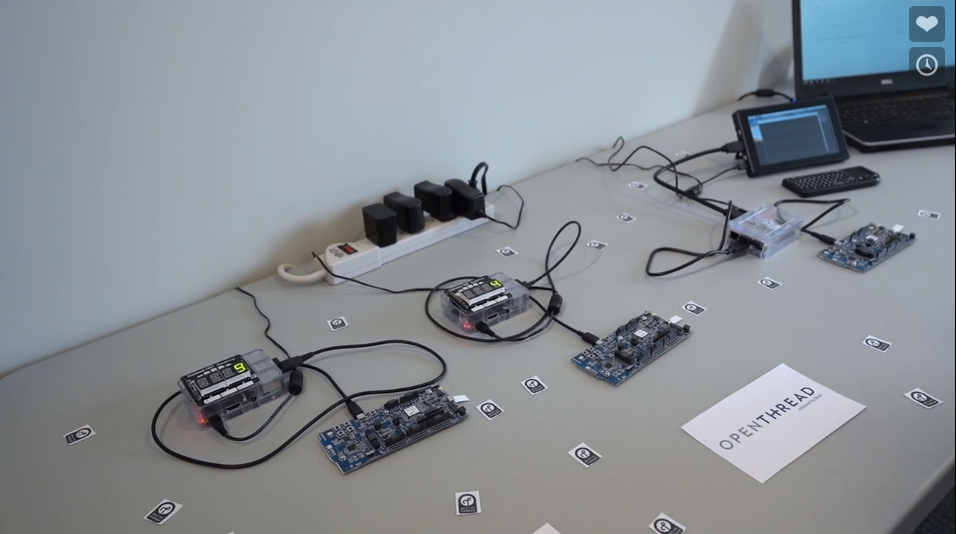
My Hardware Deployment
Here is a picture of what my deployment looks like. Share a picture of what yours looks like over in our BlackBerry Developer Forums.
About Mark Sohm
Senior Technical Solutions Manager on the Solution Architects team.
Mark Sohm joined BlackBerry in 2003 and currently works as a Senior Technical Solutions Manager on the Solutions Architects team. Mark Sohm has been helping developers create applications using BlackBerry technologies for over 15 years, starting way back with the very first BlackBerry JDK on BlackBerry OS 3.6 through to BlackBerry 10 and now Android with BlackBerry Dynamics and Android Enterprise.