
Keys Stock Photo by hyena reality. / FreeDigitalPhotos.net
Written by: John Murray
Introduction
This is the third in a three-part series of Blog Posts so if you haven’t already read the first two in the series this is a good opportunity to do so – you can find them here and here. This series arose out of my experience of needing to use the BlackBerry 10 Cryptography Library APIs and the fact that I found them extremely intimidating even though I had a fairly good understanding of cryptography and knew what it was that I wanted to achieve: generate a random number, calculate an SH256 hash, or even create RSA key pairs; yet, I found the description of the APIs themselves opaque and getting that first snippet of working code took quite a lot of effort.
Over time I managed to accumulate a number of code fragments for the more common use-cases I came across that I could easily reuse – I’m sure you do the same sort of thing! So, noticing that there were still many questions in the Developer Support Forums I decided to wrap the most common of these code fragments into a sample application to share with the wider community.
I wrote an application called CryptoSample that you can find on GitHub here:
https://github.com/blackberry/Cascades-Community-Samples/tree/master/cryptosample.
It demonstrates three common cryptography use-cases using the BlackBerry 10 Cryptography Library APIs:
- Generating a simple random number —- http://devblog.blackberry.com/2015/04/cryptography-apis-a-gentle-introduction-random-numbers/;
- Calculating Hashes (SHA1, SHA256) and HMAC using a predefined key – http://devblog.blackberry.com/2015/04/cryptography-apis-a-gentle-introduction-hashes/;
- Using RSA:
- Creating an RSA public/private key pair;
- Creating a self-signed certificate using this pair of keys showing how to select SHA256 as the hash for the RSA certificate signing rather than the default MD5;
- Encrypting plaintext and decrypting the resulting cipher text using this pair of keys.
This isn’t intended to be a tutorial on cryptography; if this is what you’re looking for take a look on the web to any of the excellent resources that you’ll find there. These are simply simple implementations of these use cases using the BlackBerry 10 Cryptography Library APIs that can be used to help you in overcoming that barrier of understanding how to use them. I haven’t touched on AES simply because there is already an excellent example in GitHub covering this specific use-case:
https://github.com/blackberry/Cascades-Community-Samples/tree/master/AESCryptoDemo
This is the third in the series and it’s all about RSA and Certificates using the BlackBerry 10 Cryptography Library APIs. So, let’s get started!
Certificates
A digital certificate is a digital document that describes a number of attributes about an entity called the subject, such as a person. These attributes might include a name, an email address, a physical address, a description of how the subject relates to other similar subjects in an organisational structure, a public key that allows another subject to send encrypted message to the subject described by the certificate or verify a digital signature signed by the subject described by the certificate etc. There are well-defined standards around digital certificate formats and the most common one is X.509.
Now, if a certificate were simply a digital document how would you assure yourself that you could trust its contents? How would you assure yourself that only that subject described by the certificate could read an encrypted email sent to them encrypted by the public key in the document?
Well, it comes down to trust. A digital certificate is also signed by another entity, usually an organisation in which you have some measure of trust.
There’s nothing really magical about such certificates, although they have a tendency to scare people, and I’ll show you how to create one using the BlackBerry 10 Cryptography Library. To keep the example simple I’ll show how to create a certificate that’s signed by the private key corresponding to the public key contained in the certificate. That is a Self-Signed Certificate. This kind of certificate can be useful for some simple tasks such as testing where you don’t need to have one signed by an external Certificate Authority.
The steps that the sample application follows are as follows:
- Create a pair of public/private keys using the RSA algorithm.
- Create an X.509 certificate describing a Mock Entity with mock name, email and organisational details using the public key we just created and self-signed using the private key we’ve just created.
- Demonstrate encryption and decryption of some plaintext using the public/private key we’ve just created.
Additionally:
- Demonstrate that this is in fact a good certificate by using some OpenSSL tools to examine it.
Using the BlackBerry 10 Cryptography Library for RSA and Certificates
So, let’s take a look at how to generate RSA keys and certificates using this library. Let’s look at the user interface first. The UI is fairly functional with a few buttons at the top and a logging area at the bottom (these screen shots were taken on a Passport device). We’re interested only in the third line of buttons in this post that deal with RSA – We covered the first row related to random numbers in the first post and the second row about hashes in the second post.
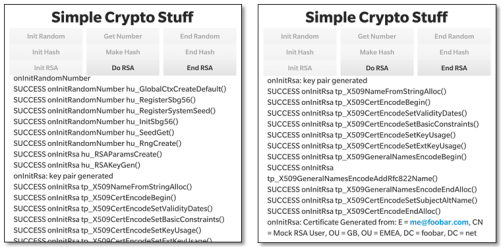
When you launch the application the first task is to initialise the RSA environment by pressing the “Init RSA” button. In the two screenshots you’ll see that there’s significant activity after we’ve done this – 8 Cryptographic API functions, all starting “hu_…” and 11 starting with “tp_X509…” have been called.
Let’s look at each of these in turn. We’ve seen the first 6 function calls before: hu_registerSbg56(), hu_RegisterSystemSeed(), hu_SeedGet(), hu_InitSbg56(), hu_SeedGet(), hu_RngCreate() are the same functions we used in the first article to create _sbCtx, an instance of sb_GlobalCtx (Global Context), and _rngCtx, which is an instance of sb_RNGCtx (Random Number Generator Context). Take a look at the first article for more details on this. I’ll just skip over these here since they’ve been covered elsewhere. I’ll also skip over the cleaning up of the environment since that’s done in an identical way to the previous two articles.
So, all we’re doing here is establishing the Random Number Generator (RNG) to be used in later steps.
The next two calls to hu_RSAParmsCreate() and hu_RSAKeyGen() are more interesting. These ones are RSA related and in fact concern the generation of the public/private key pair that is used later in the application.
If we look in more detail in the code snippets below we can see that hu_RSAParmsCreate() uses the random number and global contexts along with a specification of the desired key length ( _keyBitLength is 2048 bits which is a reasonable choice for the size of an RSA key these days). This information is squirreled away as a set of parameters that will be used later (these are kept in the params attribute of a _keySlot structure which I defined just for convenience).

The macro _CHECKRC() is simply a convenience to process the return code from the cryptographic calls and log them to the application’s screen. A successful return code will have the value: SB_SUCCESS.

The call to hu_RSAKeyGen() generates the public and private key pairs using the additional information of the exponent that should be used when generating the keys. The exponent value is in _keyPubExp, which has been set to 3.
So, now that we’ve generated a pair of suitable public/private keys let’s do something with them. Let’s create a digital certificate.
This is a little bit more time consuming and involves the 11 function calls starting with “tp_X509…” you can see in screenshot above.
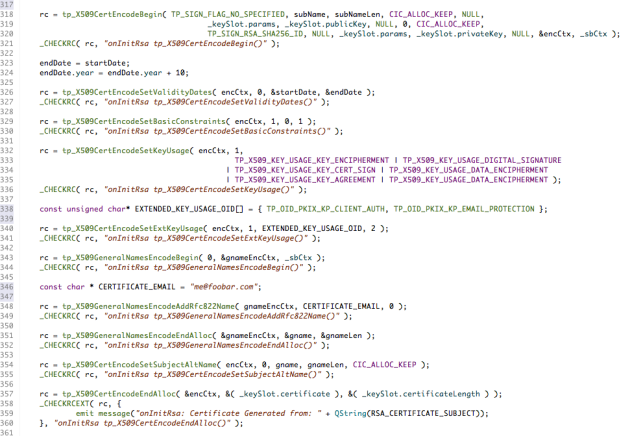
When you create a certificate you need to identify the subject of that certificate; you do this via a string like RSA_CERTIFICATE_SUBJECT in the snippet below.
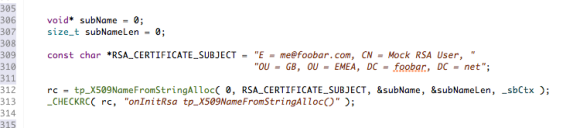
If you’ve ever created a digital certificate then this is the same information that you need to specify in a Certificate Signing Request (CSR); such as Common Name (CN), Email (E), Organisational Unit (OU) etc.
This format (IETF) is great for humans to read but it needs to be converted into another format (DER– Distinguished Encoding Rules, a binary format used in all X509 certificate related data structures.) That’s what tp_X509NameFromString() does.
Let’s take a deep breath before looking at how the certificate itself is generated. Here’s the relevant section of code in the application. I’ll step through it in easy steps – you can locate the code on GitHub here if you want to copy it or look at it in more detail.
It follows the same pattern as all of the other Cryptographic Library APIs; there is a function call that starts the process and sets up the context for a number of subsequent calls and there is a call that ends the process and cleans up. These are called tp_X509CertEncodingBegin() and tp_X509CertEncodingEndAlloc() in this case.
Specifically, tp_X509CertEncodingBegin() assembles all the bits we’ve created so far: the parsed DER subject name, the public key that will be used in the certificate and the private key that will be used to sign the certificate (we’re self-signing here so the private key of the pair we’ve created is used) into an X509 Certificate Encoding Context (tp_X509CertEncodeCtx) encCtx. I’ve also specified explicitly the algorithm that will be used to sign the certificate: TP_SIGN_RSA_SHA256_ID. If you do not specify this it will default to MD5, which is considered a weak choice these days.
Any certificate should be valid only for a contiguous range of dates so tp_X509CertEncodeSetValidityDates() is used to set the validity period to 10 years from March 2015.
Next, this is a self-signed certificate so this needs to be identified using the tp_X509CertEncodeSetBasicConstraints() function call.
Then some flags need to be set to identify how the certificate will be used (e.g. for digital signature, encryption, etc. etc.). This is done through the call to tp_X509CertEncodeSetKeyUsage(). In addition some extended usage settings, for X509v3, are provided through the call to tp_X509CertEncodeSetExtKeyUsage().
This sample adds an RFC822 email address (me@foobar.com) as an alternate name for the subject of the certificate. This is achieved as follows. The function tp_X509GeneralNamesEncodeAddRfc822Name() is used to parse the text email address and tp_X509GeneralNamesEncodeEndAlloc() is then used to convert it into DER format which is then added to the certificate using tp_X509CertEncodeSetSubjectAltName().
And, finally, the X509 certificate itself is generated using tp_X509CertEncodeEndAlloc().
Phew! That was a bit of a marathon. It’s all a bit convoluted but once you recognise the common pattern that the various functions adhere to it’s fairly straightforward.
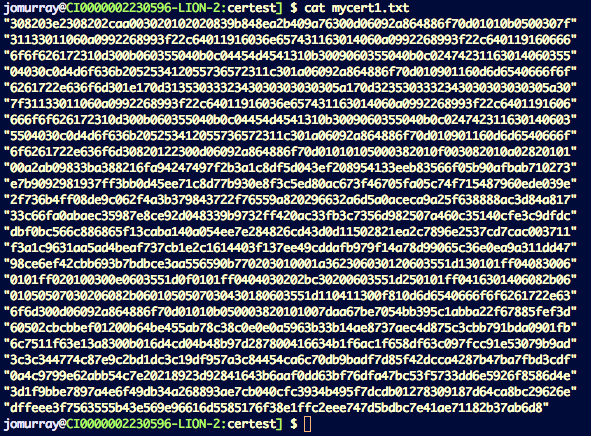
So, now we have a brand spanking new shiny X509 certificate it’s 998 bytes long and I’ve dumped it out into the Momentics console log 
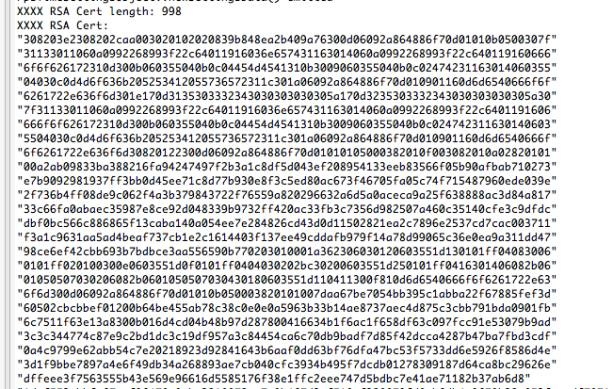 Well, that’s a bit opaque! How can I convince myself that this is actually a real and valid X509 certificate? Well, that’s actually quite easy to check. First I copied this text into a file called mycert.txt like this:
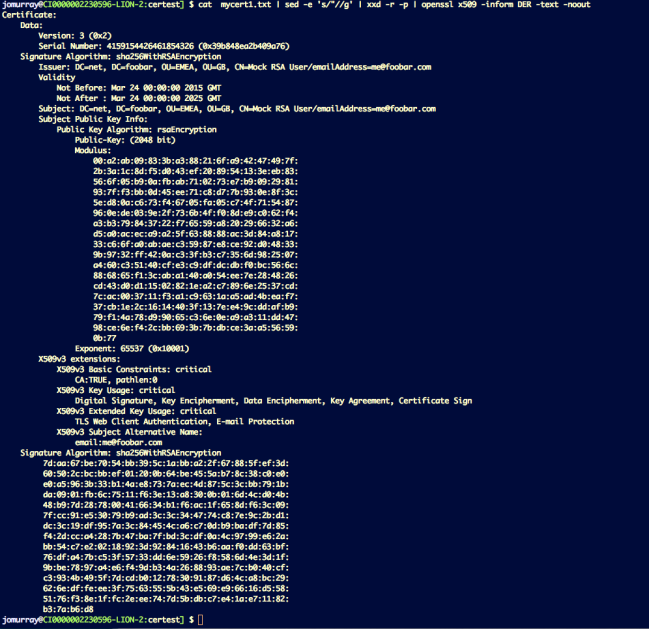
Then I ran this file through this command pipeline:
cat mycert1.txt |
sed -e ‘s/”//g’ |
xxd -r -p |
openssl x509 -inform DER -text –noout
This removed the quotes (sed), converted each text pair to a single hex byte (xxd), ignored spaces and parsed the result as a DER byte stream interpreting it as an X509 certificate (openssl) (don’t you just love bash!)
You can see the result of this in the picture below and, lo-and-behold, it’s been verified as a real, valid X509 certificate with all of the attributes that were specified when it was created using the Cryptography Library APIs. You can see that it is indeed self-signed since the issuer is the same as the subject.
Doesn’t that give you a nice warm feeling that these APIs are not really all that difficult to use?
Let’s do one more thing with the RSA keys that have been created by the application. Let’s encrypt a short piece of plaintext with the public key and verify that the resultant cipher text can be decrypted using the associated private key.
If you look further down the log that the application has produced you’ll see that it takes the predefined plaintext: “This is some plaintext! Hello Plaintext”; proceeds to encrypt it using the public key and display the resultant cipher text and then decrypts it again to recover the original plaintext! So this as verified a complete round-trip.

Here’s the associated code which just used the hu_RSAPublicEncrypt() function to encrypt the plaintext and hu_RSAPrivateDecrypt() to decrypt the resulting cipher text. You can link to this code in GitHub here.
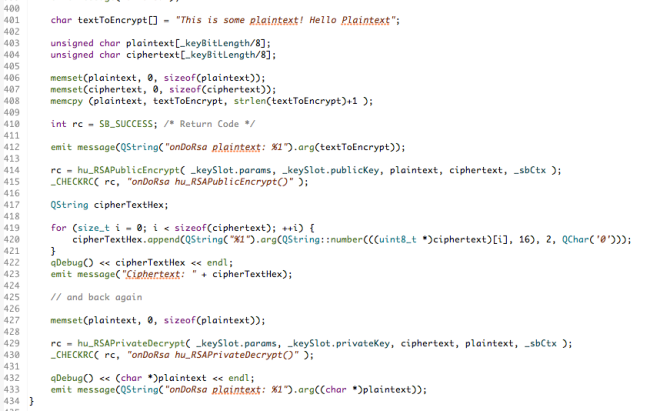
One point that needs to be made is that RSA encrypts and decrypts blocks of data. That means that any short units to be processed need to be padded out to the correct block size in such a way that the padding can be removed on decryption. I’ve taken a simplistic approach here and just padded with 0x00 for this simple example which terminates the (char *) quite nicely. However, RSA is known to have a weakness should the padding be chosen in a particular unfortunate way that could allow it to be weakened with respect to some forms of attacks. Choosing the way that padding should be performed is not something that the Cryptographic Library APIs can help you with and you should consult one of the suitable resources on the Web to understand how to do this properly without compromising integrity.
Summary
I’ve released v1.0.0 of the CryptoSample sample application containing the features described in this article and so you can download, review and reuse the full source code – you can find the URL in the “Resources” section below. I hope this has been interesting and will help set you on your way developing real-world applications for Blackberry 10.
Please feel free to contact me, @jcmrim, via Twitter if you need any help on anything related to this article.
I’ll follow this article with a final one covering the topic of RSA.
Resources
Cryptography APIs – A Gentle Introduction – Random Numbers
Cryptography APIs – A Gentle Introduction – Hashes
BlackBerry 10 Cryptography Library APIs
https://github.com/blackberry/Cascades-Community-Samples/tree/master/cryptosample
https://github.com/blackberry/Cascades-Community-Samples/tree/master/AESCryptoDemo
Contacts
John Murray – @jcmrim